This is really quite simple. I'm sure you could put this together without my instructions, but here goes anyway. I used a glass and backing kit from Michael's, Mod Podge, a paint brush, leftover frosted window film (and the tools needed for that), fabric, and puffy stickers found in the scrapbooking section of Michael's.

The first step was to apply the fabric to the cardboard backing. I did this using Mod Podge. Now that mine is done, I can tell you that I would NOT recommend stripes. Even though I tried my hardest to get the lines straight, they're not perfectly straight, and it's driving me a bit crazy.

I only Mod Podged the back. I didn't even bother with brushing Mod Podge on the front of the fabric. Then I trimmed the edges and put it aside to dry.

Next I put the glass on a towel and cleaned it well...

And then applied the frosted window film according to the directions.

I bought mine at Home Depot, and they had a couple of brands, so they might have slightly different instructions. I definitely would NOT purchase the film just for this project. I actually purchased mine for a window, and then used the leftovers on this. If you don't have a window to frost, or you can't find friends to split the cost with you so you can all make message boards, then I would suggest using the more cost efficient glazed glass spray.
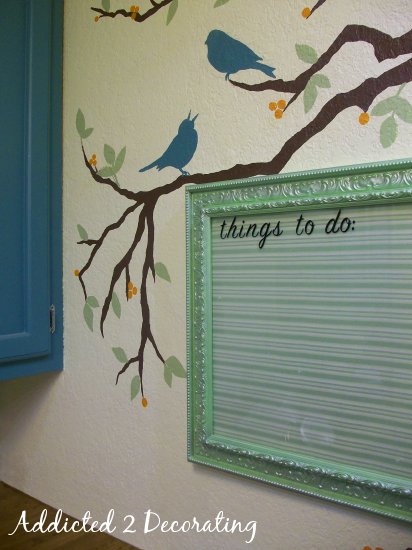
When it was all put together, it looked like this...

You can see here how the frosted window film really toned down the fabric, which I think makes it more appropriate for the backing of a message board.

To finish it off, I added these puffy letter stickers that I found in the scrapbooking section of Michael's.

I wanted to write out "messages", but there weren't enough S's in the package, so rather than purchasing another entire package just for one S, I opted to write out "things to do".

This was such a simple project. I can't believe it took me a year to get it done!!! Of course, if I had done it any earlier, it would look different, because I only recently discovered frosted window film. So I guess I'm glad I waited so long.

That Looks Awesome !!!
ReplyDeleteLove this!
ReplyDelete