Behind every Soldier is a woman who stands beside him, supports him, and loves him with all her heart. <3


Monday, August 8, 2011

Day 12- Gumball Machine Candy Pot

LOVE these. I saw these on a page on fb selling these for $30!! Crazy since you can make them yourself for less than $10! You can also give them out as gifts, or make them your own for decorations!! This tutorial is from lifesweetlifeblog.com


 I wanted to do it in a color that I could use for multiple holidays, but my obsession with red & turquoise won out. I still think it can work for a lot of things though, especially if I switch the ribbon out. It is very simple and cheap to make...here's how you can make one too!
I picked up all of my supplies at Hobby Lobby. This is what you need:
  • clay pot
  • base to clay pot - (Not the same size as the pot. This needs to be the right size so that it will sit on top of the fishbowl.)
  • fishbowl jar
  • paint color of your choice
  • foam brush
  • E6000 glue
  • wooden knob
  • ribbon of choice
  • glitter & Elmer's glue (optional)
  • vinyl or stickers to embellish jar (optional)
1. Paint your pot, the lid, and the wooden knob. I did a couple of coats to get good solid coverage.
2. Once the pot is dry, turn it upside down and use E6000 to glue the fishbowl to the pot.
3. Use a dab of the E6000 to glue the knob to the bottom of the clay pot base.
4. Optional: I also glittered the lid. To do this, just spread Elmer's glue on the inner part of the lid and cover with glitter.
4. Allow a few hours for the items to dry completely, then tie on the ribbon of your choice. You can also cut out a fun phrase with vinyl using your Cricut or stickers would also work if you'd like to embellish the jar.
5. Fill the jar with candy and top with the lid...that's it!
Wouldn't these also be fun to make for a birthday party or baby shower? Such fun decorations for very cheap!

Sunday, August 7, 2011

Day 11- Flower Hair Clip or Broach

Stinkin adorable. I absolutely LOVE making these. got this from simplyvintagegirl.com

Fabric Flowers
These elegant fabric flowers are very simple to make . . . and only take a few basic supplies. The finished product is delightfully lovely, and at times can look like a real flower! Every flower will turn out differently and that is part of the beauty!
If you haven’t used those tea lights in a while, now’s the time! I hope you enjoy making these as much as we do . . . below are instructions with pictures on how to make your own.
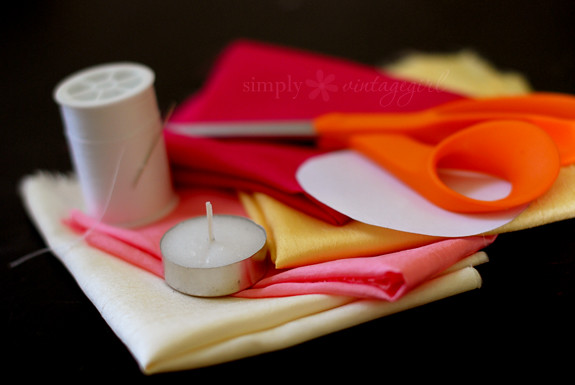
Fabric Flower Tutorial: Supplies
Supplies:
· Synthetic Silky Fabric
· Scissors
· Candle (preferably a tea light)
Additional supplies:
· Needle and Thread, Glue Dots or Glue Gun
· Buttons and/or Beads
Directions:
Fabric Flower Tutorial: Step 1
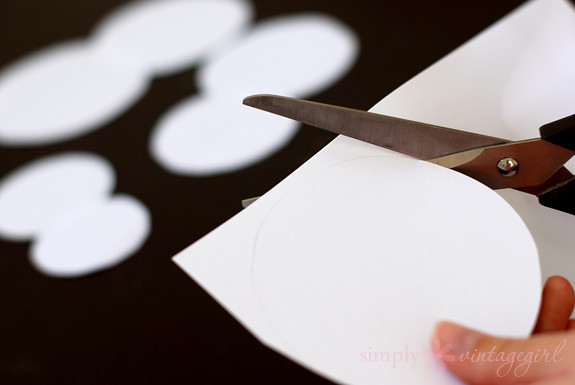
1. Cut circle patterns out of card stock.

Make the largest one’s diameter about half an inch larger than you want the diameter of the flower, as the petals will end up shrinking a bit. Create a few of these, lessening the diameter bit by bit so that the end result has smaller petals in the center and larger ones around the outside. You can also use a pattern here, which works very nice!
Fabric Flower Tutorial: Step 2
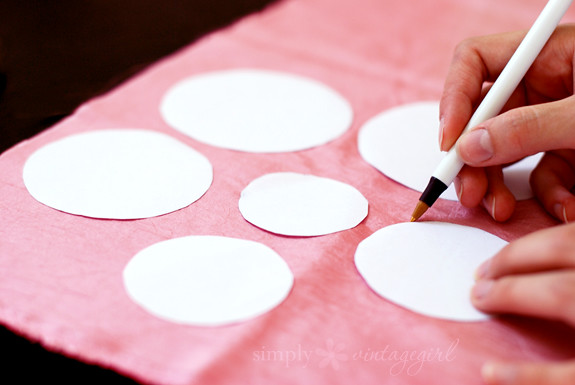
2. Trace around the pattern onto the silk fabric (using a pen).

You can also cut around the pattern and skip the drawing part, it just might not be as uniform . . . but with these, uniform isn’t necessary. And if it’s not uniform, it adds character. And character is good.
Fabric Flower Tutorial: Step 3
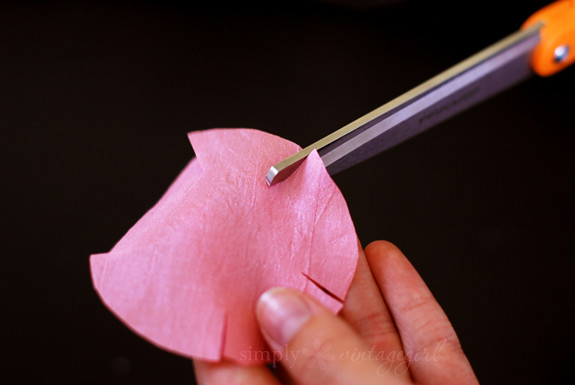
3. Take the scissors and cut out the circle and petals.
Cut just inside the drawn lines to make a circle out of the fabric. Carefully cut only about a third of the way into the circles to create the petals. You can do as many or few petals as you would like, or even add some variety to them. I cut five times, making five medium-sized petals. You can also round the corners of the petals, if you so desire.
Fabric Flower Tutorial: Step 4
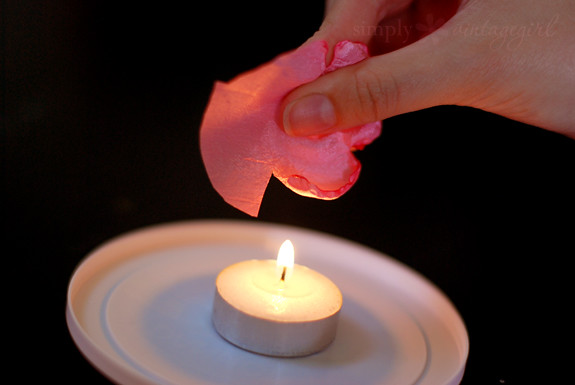
4. Use the lit candle to melt and crinkle the edges.
Be very careful (please have adult supervision, this is rather dangerous), as it is very easy to get burnt. Hold the cut petals about one to two inches above the flame, making sure to keep the circle rotating so that it does not overheat and catch fire. Continue to gently melt the edges of each petal until you have gone all the way around. Do this with each layer.
Fabric Flower Tutorial: Step 5
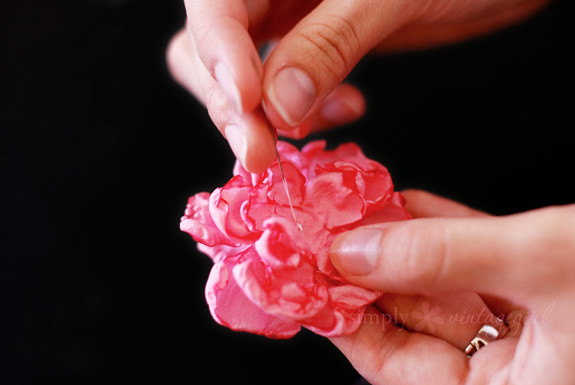
5. Sew (or glue) the petal layers together.
Using a needle and thread, create a beginning knot and then sew the layers together. You can come up through the top because the center of the top layer can be covered by a button or bead. To finish the flower, sew (or glue) the button or bead on top.
If you would like to add extra stability to the flower, you can sew or glue a piece of felt onto the back (make sure it is large enough to give good stability, but small enough so that it won’t be seen from the top).
For a hair accessory, you can sew or glue the back of the flower to the back of a bobby pin, ponytail holder, or snap-clip.
For a broach, you can sew or glue them onto a broach pin or even a safety pin.

Saturday, August 6, 2011

Day 10-Trendy Clip Board

this craft came from www.thefrugalgirls.comA few years ago, I made my first decorative clipboard. They’re fun to use, simple to make, and are a great thrifty gift, too!!
I’ve given them to teachers, friends, family members, and… myself! ;)
Would you like to make one, too? Seriously, you can do this!! Here’s how…
What You’ll Need:
  • Clipboard {I buy mine at Wal-Mart for $1.00} ~ you’ll want your clipboard top to be similar to the one pictured below… it will allow you to tie on ribbons!
  • Sponge-style Paint Applicator {small and large} ~ when you’re done, wash these out and save them to reuse again later!

  • Mod Podge ~ I prefer the Matte variety {found at craft stores}

  • 12×12 regular Scrapbook Paper {not cardstock ~ trust me!}
  • Ribbon {thin} in a variety of colors & styles that match or coordinate with your paper. I cut pieces of ribbon between 6″ – 7″ long.

  • Scissors
  • Ruler
  • Corner Rounder {if you have one}
  • Push pin or Xacto Knife
What You’ll Do:
  • The first thing you’ll need to do is trim the paper down to fit the clipboard.
  • Turn paper over and measure with a ruler.
  • You’ll want the paper to be approx. 1/4 inch in from the edges of the clipboard.
  • Once the paper has been trimmed down to fit the clipboard, use a corner rounder {or scissors} to gently round the corners of the paper…
  • Now you’ll need to flip your page over again, and get ready to carefully make a cut out around the clip at the top…

    • Now set your paper aside.
    • Lay down newspapers ~ it’s time for some fun with the Mod Podge!
    • Use the large sponge brush to make long strokes from top to bottom,
      of a thin layer of Mod Podge on the clipboard.
    Be careful now ~ Catherine Zeta-Jones is watching you…
    do you see here on the newspaper there?
    She thought I did a good job… she’s smiling!
    She’s calling Michael Douglas to let him know.
    • Now carefully lay your paper that you’ve prepared on the clipboard {color side up}.
    • Gently smooth it down with your hands to avoid bubbling.
    • As it begins to dry, if you see bubbles, you can…
      carefully poke them with a pin needle, push pin or Xacto knife tip.
      {Card stock will really bubble, so promise me you didn’t use it.}
    • Let glue completely dry {30 min. – 1 hr}
    • After it has dried, it’s time to do a layer of Mod Podge on the top!
    • Use long strokes from the top to the bottom again. {You can use the smaller brush to get around the clip at the top.}
    • After you’ve applied the Mod Podge, allow it to dry completely.
    • Just like before, you can watch for any little bubbles,
      and either poke them or gently smooth them out with your hand as it dries.
    • Once it has dried completely, just for fun… it’s time to add one more coat of Mod Podge.
    • After applying that last coat, allow it to dry completely.
    • Now if you want to add anything else {a photograph, letters cut out to spell a name, etc.} you can add them after the final coat has dried.
    • Just put a dab of Mod Podge on the back, then add Mod Podge over the entire top.
    • Allow to completely dry… and then on to the ribbons!
    • Once the clipboard is dry, begin adding the ribbons and knotting them up at the top on the clip.
    • Once you’ve tied on all the ribbon, trim them down if they’re too long,
      then trim the ends slightly diagonally in alternating directions. {I usually start with ribbon pieces that are 6″ – 7″ long}
    • Have fun with the colors… here’s one I made using pink paper and pink & white ribbons…
    Make one for yourself, or give some as thrifty gifts!

    Friday, August 5, 2011

    DAY 9- Hair ties.

    These are so sweet, simple, and speedy. This craft came from lilblueboo.com


    I love these elastic hairbands (or hair ties)…..and with an etched glass recycled jar they make a cute, practical gift too!


    On my last trip to L.A., I bought a bunch of foldover elastic (FOE) by the yard (I’ve seen rainbow lots of FOE on ebay if you are looking for a source):


    To make an elastic hair tie just cut a strip about 7 inches long, fold it in half and then tie a knot at the bottom. Clip off the end at an angle to make it neat and pretty:


    A large assortment of colors is what makes it such a great gift…who wouldn’t want to receive these as a present? I love using these in Boo’s hair because they don’t break and they don’t tangle either:

    Day 8- Jewelry or Bow Holder

    I might just be a sucker for this stunning blue color but this project totally caught my eye! I am loving this beautiful wired frame created by The Gunny Sack!
    I’ve seen a few of these Framed Wire Memo Boards online…I even “stuffed” some in my gunny sack! I finally gave it a try and am happy with the results!
    I picked these beauties up at my local thrift store for $1.50 a piece. The frames are plastic.
    With my handy dandy Black and Decker screwdriver I removed the screws that held the back in place.
    Using a primer, I coated the frame. BTW my son found the Close To Home comic in the frame very hilarious…it says “To encourage young teen boys to use deodorant, Mennen unveils its new Speed Stick Slide.”
    After letting the primer dry, I spray painted this Krylon, satin finish, teal color over the primer.
    Here it is…painted and dried!
    Next, I traced the back piece that I had removed earlier onto the wire with a permanent marker. Using a wire cutter, I clipped the wires at the markings.
    It didn’t fit perfectly (of course) so I had to do a little more clipping, as I fitted the wire oval onto the back of the frame. One again, using the B & D screwdriver, I put the screws back in place trying to make sure they caught some of the wire underneath to hold it.
    Both clothes pins and magnets (because the wire is metal) work for holding items in place. As does just poking them through the holes.
     

    DAY 7- THE famous ACU wreath!!

    Got this from luvmyarmyboy.blogspot.com

    ACU Deployment Wreath


    ACU fabric-I used 2 uniforms but you can use one. Using two uniforms make the wreath full, one will do the job it just wont look as full but will still look GREAT!
    Using your Pinking Sheers, cut your fabric into 2ish inch squarish pieces.
    You don’t need to be exact, just try to make them about the same size and shape. * if you don't pinking shears they sell them at the Arts & Craft store here on Post[WETZEL]or the the PX they're a little pricey $25.00
    the squares should look something like this :)
    Supplies:
    • Styrofoam Wreath Form
    • Approximately 1 yard of assorted fabric
    • Pinking Sheers
    • 1 pencil or other object with a blunt point
    • Other decorative ribbons, medals, name tapes, flags to dress up the wreath
    Now the fun begins. Take one piece at a time and use your pencil to poke the square into the Styrofoam

    push into stryofaom, not too hard a gentle push will do

    Repeat this process
    if using one uniform do not push the pieces so close together but don't leave a gap
    Keep going, one square at a time. Filling in and avoiding any bare spots. FYI-I used two uniforms on this wreath so it is very full....if your using one uniform it won't turn out like this one but will still look great!


    finished wreath! you did it :)
    time to decorate...I used a US ARMY MEDAL and yellow ribbon for center of wreath
    adding name tapes to each side and little yellow ribbons all around
    *for the hanging handle, I just used a strip of the ACU and hot glued it on*